 Moo Classic Wiki
The Moo Helper
Four ways to move. The Hunting tab has four buttons: Stand, Roam, Gather and Follow. Gather pulls monsters together so one area spell hits many, the way strong players do it by hand. See Gather below.
The helper is open to every player from the first season. The character must stay in the game for the helper to level it.
It works for every class (Classes and stats): Dark Wizard, Dark Knight and Fairy Elf from Season 0, the Magic Gladiator from Season 1 and the Dark Lord from Season 2. An Elf also heals herself and the party.
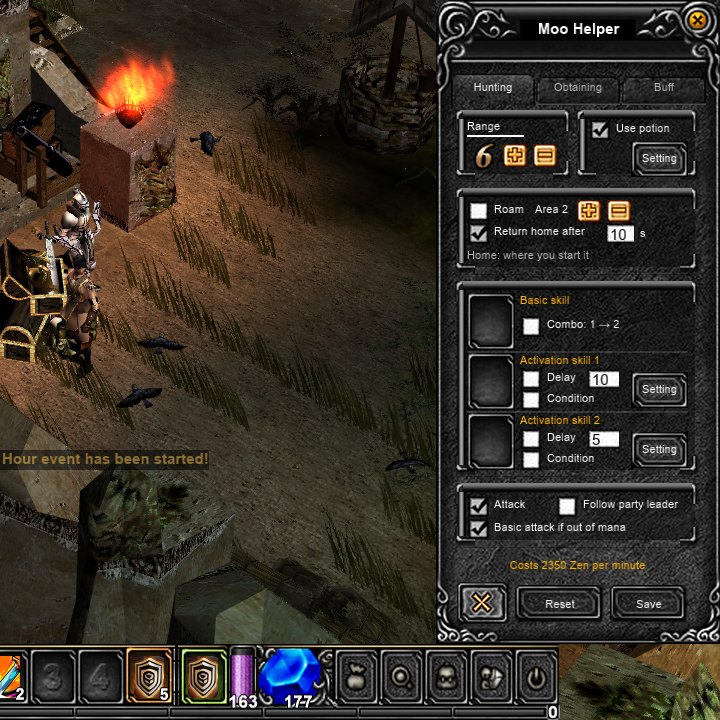
Quick facts
| Setting | Value |
|---|---|
| Needs | Level 20, alive |
| Season | Available from Season 0 for every class, including the Magic Gladiator and Dark Lord when they join |
| Start or stop | Z |
| Open the window | Shift + Z |
| Price | Shown in the window as "Costs N Zen per minute" |
| Price at level 100, first hour | 2,000 Zen a minute |
| Price rises | Every hour it runs without a stop |
| Hunting range | 1 to 6 (default 6) |
| Pick-up range | 1 to 8 (default 8) |
| Roam size | 1 to 5 (default 2) |
| Gather stack | 2 to 8 (default 5) |
| Golden Member | Pays 20 % less in every mode |
This page lists every setting, what each one costs, when the helper pauses and when it stops.
Starting and Stopping
- Press Z, or the small play icon beside the position box in the top left corner, to start it. Press Shift + Z, or the small setup icon next to it, to open the window.
- It starts where you stand. That spot becomes its home.
- Settings are saved and restored at the next login, so you set it up once.
- Press Z again to stop it. The chat shows "MU Helper stopped." and, if any Zen was spent, the total.
- Under level 20 the start and setup buttons are greyed out. In a safe zone, such as Lorencia, the window still opens and the helper can be started.
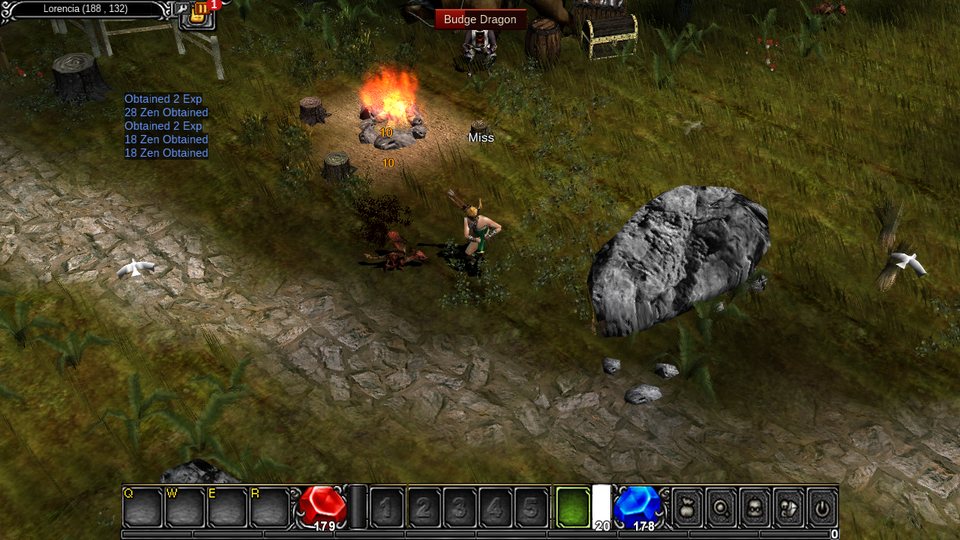
Each Zen pick-up shows a line "N Zen Obtained" next to the experience lines.
Price
The cost line at the bottom of the window shows the current price for your level and the settings that are switched on. The price follows your level and goes up for each hour the helper runs without a stop. It starts again from the first hour's price when you stop it.
| Level | Zen a minute | Zen for the first hour |
|---|---|---|
| 20 | 400 | 24,000 |
| 50 | 1,000 | 60,000 |
| 100 | 2,000 | 120,000 |
| 200 | 4,000 | 240,000 |
| 400 | 8,000 | 480,000 |
The window shows two lines: the price for one minute, and about what an hour costs at that price with the minutes left before it goes up. A Golden Member sees "(Golden Member -20%)" beside the first line.
Those are base-settings prices with Roam off. The base settings are the potion, the basic attack and the default pick-up kinds (jewels, set items, excellent items and Zen). An Elf also gets the self-heal ("Heal yourself at N %").
| Level 100, hour of non-stop use | Zen a minute | Zen for that hour |
|---|---|---|
| 1st | 2,000 | 120,000 |
| 2nd | 2,500 | 150,000 |
| 3rd | 3,000 | 180,000 |
| 4th | 4,000 | 240,000 |
| 5th and later | 5,000 | 300,000 |
Roam is off by default. Turning it on makes the price much higher, and a bigger area costs more:
| Roam size | Level 100, first hour, Zen a minute |
|---|---|
| Roam off | 2,000 |
| 1 | 4,000 |
| 2 (default size) | 8,000 |
| 3 | 12,000 |
| 4 | 16,000 |
| 5 | 20,000 |
The mode you pick sets the price. A Golden Member pays 20 % less in every mode.
| Mode | Level 100, first hour, Zen a minute | Golden Member |
|---|---|---|
| Stand | 2,000 | 1,600 |
| Roam, size 2 | 8,000 | 6,400 |
| Gather | 4,000 | 3,200 |
| Follow | 2,000 | 1,600 |
Each of these options adds a small amount to the price: Pick all near items, extra items by name, Repair, Heal party, Buff party, an activation skill, Combo, and Resummon. For a level 100 character in the first hour, each one adds 500 Zen a minute. Switch on only what you use.
- Zen is charged at the end of each full minute. When the helper stops, the part of the minute already begun is charged too.
- Stopping and starting again returns the price to the first stage.
- If there is not enough Zen for a minute, the game says "MU Helper requires N zen." and the helper stops. It does not keep running for free: press Z to start it again once you have the Zen.
The window
The window has 3 tabs: Hunting, Obtaining and Buff. Settings save by themselves about a second after each change, and again when the window closes, and are restored at the next login. The Save button stores them and closes the window. Reset puts every setting back to its default and keeps the item name list.
On a phone or tablet the window opens as a wide panel with big tabs, checks and number fields.
Hunting tab
Four buttons under the Range box pick how the character moves. Only one is lit. The line under them shows that mode's own setting.
| Button | Setting under it | What it does |
|---|---|---|
| Stand | Return home after N s | Hunts round the spot where you started it and walks back when it has been away too long. |
| Roam | Area 1 to 5, + and − | Walks on from monster to monster inside its area. See Roam. |
| Gather | Stack 2 to 8, + and − | Pulls monsters in, then casts the area skill. See Gather. |
| Follow | none | Hunts round the party leader. |
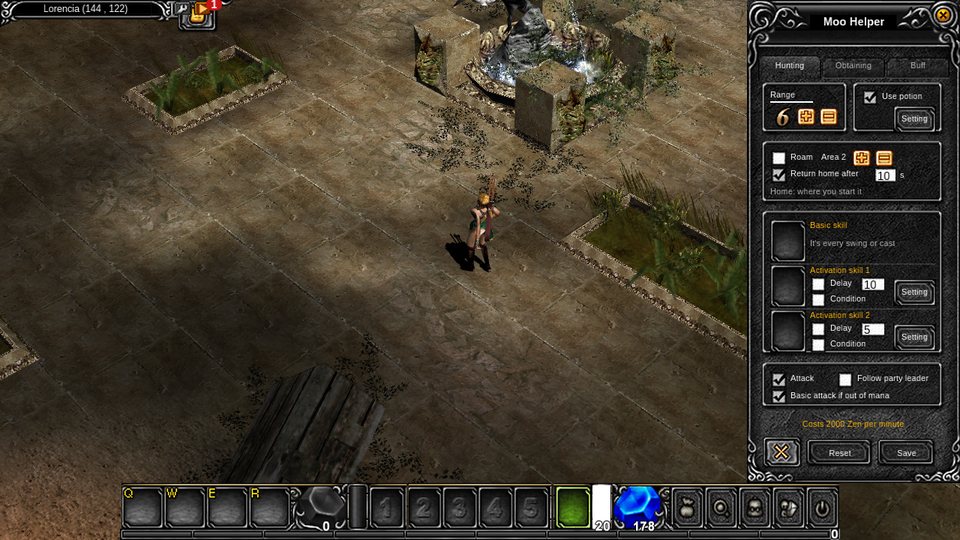
| Setting | Default | What it does |
|---|---|---|
| Range | 6 | How far from home it hunts. |
| Use potion | On, at 40 % | Drinks a healing potion when life falls below the set percentage. The Setting button changes that percentage. |
| Drink a mana potion | On, at 30 % | Drinks a mana potion when mana falls below the set percentage, the smallest one that does the job. Options' Auto mana potion sets the same level for hunting by hand. |
| Roam | Off | A hunting mode with its own area. See below. |
| Return home after | On, 10 s | When it has been away from home for that long, it walks back. |
| Set here | Makes the spot where you stand the new home. | |
| Basic attack when out of mana or AG | On | While the skill lacks mana or AG, the helper swings the basic attack and goes back to the skill once there is enough. Off, it stands and waits, and the chat says once what it waits for (mana or AG). With no skill it can cast at all (none set, or greyed), it always swings; a skill cooling down is always waited out. |
| Follow party leader | Off | See below. |
| Basic skill | The skill for every swing and cast. | |
| Activation skills 1 and 2 | Off | Extra skills the helper casts besides the basic skill, used on a delay (every N seconds, 10 and 5 by default) or on a condition. |
The 2 activation skills are for skills you want on top of the basic one, such as a debuff or an area skill. A delay of 10 s means the skill is cast again every 10 s. The condition can be "a monster is in hunting range" or "a monster attacks me", with a number of monsters near you.
A Dark Knight has a Combo option for its basic skill (skill one, then skill two). Resummon, on the Buff tab, summons the pet again when it has died. A Dark Lord has 1 activation skill.
When a monster hits the character, the helper fights back, even if the monster is outside the hunting circle. It finishes weak monsters before it moves on to others.
Obtaining tab
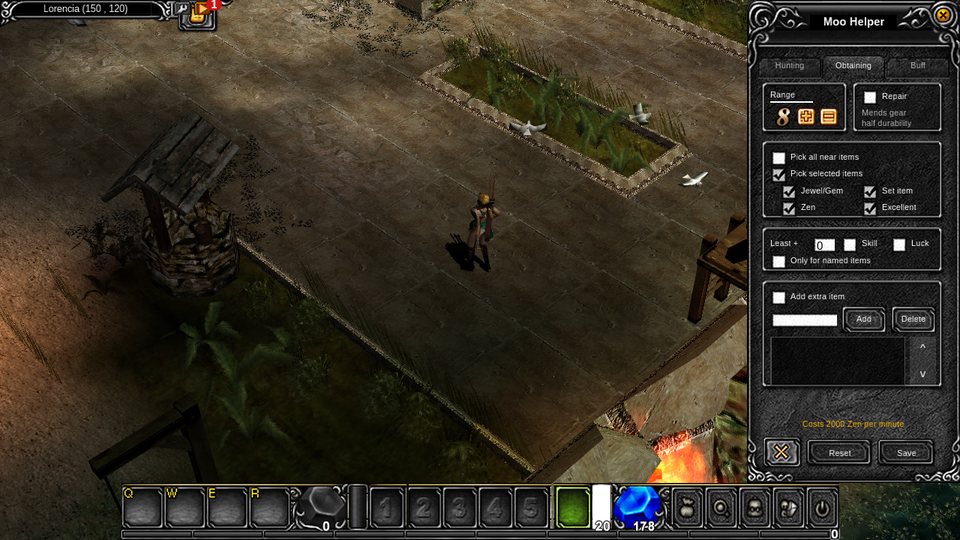
| Setting | Default | What it does |
|---|---|---|
| Repair | Off | Mends a worn item at half durability (the yellow mark), one item at a time. It pays the repair price. |
| Jewel/Gem | On | Every jewel. |
| Excellent | On | Every excellent item. |
| Ancient | On | Every ancient item. |
| Zen | On | Every pile of Zen. |
| Named items | Off | Picks up items by name. Type a name, then Add or press Enter. A part of a name is enough: "star" picks up every item with star in its name. Delete removes one. Up to 12 names, the count under the list shows how many are used. |
| Pick all | Off | Picks up every drop in the pick range, junk too. The other kinds and the gear rows step aside (greyed) while it is on. |
Each kind works on its own. Nothing holds another kind back: an excellent item is picked up whatever its level, and a name on the list is picked up at any level.
The gear table
Under the kinds there is one row for each kind of gear: Weapons, Armour & shields, Wings and Rings & pendants. Tick a row to switch it on. Its Least + box and ticks wake up.
| Column | What it asks for |
|---|---|
| Least + | The lowest item level. 0 takes every level. Rings and pendants have no level, so no box. |
| Skill | Weapons with Skill. Only weapons have it. |
| Luck | Gear with Luck. |
| Option | Gear with an additional option (the +4, +8 and so on). |
- A row wants an item of its kind that reaches the level and has every box ticked in that row. With no box ticked, it wants every item of the kind at that level or more.
- The rows are separate. Gear that passes any one row is picked up.
- All rows start off. Wings +0 with nothing ticked picks up every wing.
If you used the Least +, Skill and Luck boxes before this change, your old setting becomes rows: the weapons, armour and wings rows switch on at your level (with Skill and Luck as you had them). Settings that only applied to named items are dropped.
While under attack, the helper keeps fighting instead of walking off for loot, and only picks up items lying close by. It leaves alone items the character dropped itself, and gives up on an item it cannot pick up. A drop that belongs to another player is asked for again until it is free.
With the Panda worn, the helper only runs for jewels, excellent items, ancient items and items you named in the list; the Panda picks up the zen and the listed items within its reach.
Buff tab
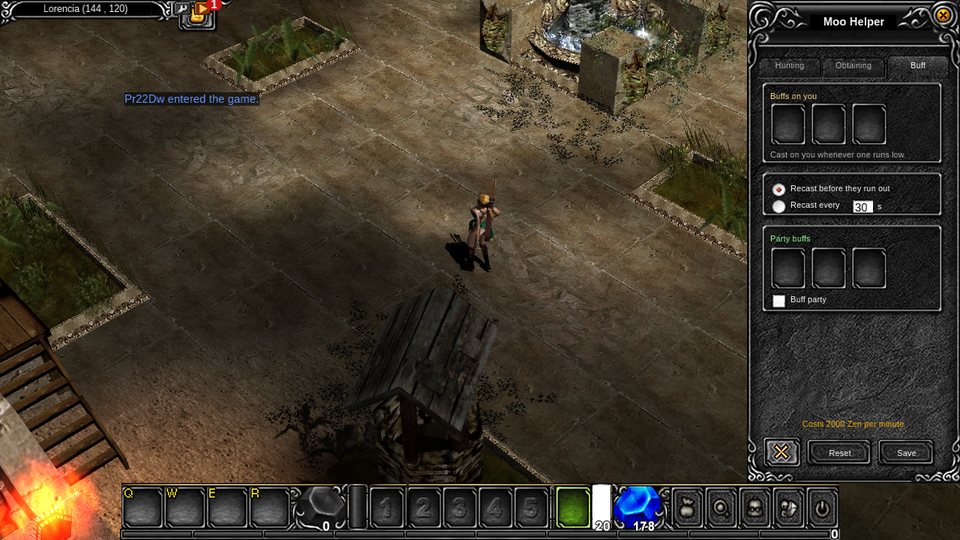
| Setting | What it does |
|---|---|
| Buffs on you | Three slots for the buffs you cast on yourself. Until you change them, they hold your own buffs from the list. |
| Recast before they run out (default) or Recast every N s | When a buff is cast again. |
| Heal yourself at N % | On, at 60 %. Elf only. Heals you at that life level. |
| Summon, Buff summon, Resummon | Shown when you know a summon skill. Buff summon buffs your summon even with Buff party off. |
| Party buffs | Three slots for the buffs cast on the other members. |
| Buff party, every N s | Off by default; the timer is 30 s. Casts the party buffs on members, on that timer. |
| AE or EE | Elf only, the 2 Elf modes. AE (attack and buff) hunts and casts the party slots between fights. EE (support) buffs and heals and never attacks. |
| Heal party at N % | Off by default, at 60 %. Elf only. Heals the lowest member at or under that life level. |
Roam
Roam moves the hunting circle with the character, so it hunts wherever it walks.
- The area is 10 steps per size, counted from where Roam began. Size 5 therefore reaches 50 steps. The size is 1 to 5, set with the + and − buttons beside "Area".
- Roam never enters a safe zone.
- When the circle is empty, the character walks to a monster in sight. It never leaves the area and never returns home.
- Each size costs more. The cost line in the window shows the price.
Gather
| Setting | Default | What it does |
|---|---|---|
| Stack | 5 (2 to 8) | How many monsters it waits to see together before it casts. It casts anyway after a few seconds. |
| Range | 6 | The most it goes out to fetch. It never leaves this circle. |
- It needs an area skill as the basic skill, such as Evil Spirit for a Dark Wizard, Twisting Slash for a Dark Knight or Triple Shot for an Elf. Without one the window says "Needs an area skill as the basic skill", and the helper hunts as Stand and costs what Stand costs.
- It costs twice what Stand costs. A Golden Member pays 20 % less.
- It will not start within a few steps of a safe zone: "Gather needs a spot away from town."
- It never fetches golden, boss or event monsters. When one joins the group, it hunts the way Stand does.
- It never pulls a monster that is nearer to another player than to you, and never along a path close to a player outside your party.
- When your life gets low it stops fetching and fights, drinks potions and casts at once.
- The character walks and casts at the normal speed. Picking up, the Panda and the other settings work as they do in the other modes.
Gather works best where monsters stand in groups. On a thin field the stack stays small and it casts on the few it has.
Return home and Set here
- With Return home on, the helper walks back home once it has been away for the time you set. If you click the ground, the helper pauses. Home does not change, and the helper walks back afterwards.
- Set here makes the tile you stand on the new home.
- Roam, Return home and Follow party leader cannot be used together. Turning one on turns the others off.
- The four buttons work the same way: choosing Roam, Gather or Follow turns Return home off, and choosing Stand turns it back on.
Follow party leader
- It needs a party. If you lead the party, the helper follows the next member in the party list.
- The chat tells you whom it follows, and when it stops.
- The hunting circle moves to the leader. The helper walks after the leader and stops beside them.
- It pauses when the leader teleports, warps or dies, or when the party ends. It resumes when the leader is back in the circle. It keeps following in the middle of a fight, and when the leader walks out of sight.
Tips
- Set the potion level well above the point where one hit could kill you. A low level character with the potion off will die and the helper will switch off.
- Keep the hunting range small on a crowded map. A big circle pulls monsters from several groups at once.
- Use Pick selected items with the default kinds. Pick all near items costs more and fills the bag.
- Turn Repair on for a long run. Worn gear loses damage and defense.
- Roam costs the most. Use it only where monsters are spread thin, and prefer a small size.
- Gather pays off where monsters stand in groups and your basic skill hits an area. Try it at a dense spot before you leave it running.
- Check your Zen before you start. At level 100, 1 hour on the base settings is 120,000 Zen.
- A Dark Knight with Combo, or an Elf in AE mode with party buffs, pays extra for each comfort. Switch on only what you use.
- The helper is not a way to level while logged out. Stay in the game, and press Z again when you come back.
- Set Return home to a time that suits the map. A short time keeps the character near its spot after a fight that drew it away.
- Resummon only matters if you know a summon skill; see Summons.
- For party play see Party and PK. For skills see Skills and Classes and stats.
Classes
- Fairy Elf: heals herself first, at the Heal yourself level, then the party at the Heal party level. An Elf, or any hero who fights from range, shoots what it can reach before it walks anywhere, and stops walking home between kills. She buffs herself from her own buff slots and the party from the party slots. AE (attack and buff) hunts and buffs. EE (support) buffs and heals and never attacks.
- Dark Knight: the Combo option on the basic skill.
- Dark Lord: 1 activation skill. The Dark Lord joins Moo Classic in Season 2.
- Dark Wizard and Magic Gladiator: use the basic skill, the 2 activation skills, the potion and the pick-up settings.
- Before you save any settings, each class fills its three buff slots with the buffs it knows.
When it stops
| Cause | What happens |
|---|---|
| Z pressed | It stops. |
| The character dies | It switches off. A dead character cannot start it. |
| Warp to another map | It stops. |
| Out of Zen for a minute | "MU Helper requires N zen." It stops, and Z starts it again when you can pay. |
| Leaving the game | It stops on the server too. |
While it runs, walking into a map gate does nothing and the chat says "Turn off the Moo Helper to use portals." The helper keeps running. Click a gate yourself and you go through, and the helper stops on the new map.
These pause it without stopping it:
- A safe zone, such as a town. It continues when you leave the zone.
- An open personal store, trade, shop, vault or mix window.
- A click or Space from you. You control the character for a moment, then the helper continues.
A teleport of up to 12 tiles on the same map does not interrupt it.
Each Zen pick-up shows a line "N Zen Obtained" next to the experience lines.
A monster the helper has hurt badly stays its target, even outside the hunting circle.
A Golden Moo in your hunting area comes first: yours, a party member's, or one of the Golden Moo event's, so it doesn't wander off or leave before it is killed. Another party's Golden Moo is left alone, as only its owner's party can hit it.
The helper first finishes a monster that is nearly dead, and fights back first when your life is under 40 %.
The helper stays on the monsters it is fighting when another golden, boss or event monster, such as the event's Elite Golden Moo, hits you. It goes for that one only when it is the only monster in reach, when you click it yourself, or when your life is under 40 %.